

Lavender & Honey Sparkling Lemonade has the subtle sweetness of golden honey, tart and refreshing lemony zest, gentle floral notes, and the perfect amount of bubbly sparkle! This Springtime-inspired bubbly beverage is great for brunch. Healthy, and not too sweet, this delicious and beautiful mocktail will be a huge hit!

Spring is in the air. Flowers are blooming, leaves are budding on the trees, and the days are getting longer! (Which is my favorite part!)
Spring is time to renew, refresh, and clean out your closet. Ever year I try to go through my wardrobe, with a determined effort to get rid of stuff I don’t wear. It never seems to work. There is always some reason to hold onto that pilly sweater (but it so comfy), or that pair of pants (that I will surely fit into this year!). Right!? Well, at least I try!

For me its also time to clean up my diet. I know everyone jumps on the Whole 30 deal in the winter, but not me. During the colder months I like to indulge in a little too much sugar, and love my comfort foods. But once it starts to get warm I want to eat refreshing, lighter, and healthier fare like salads, fruits, smoothies, and cool refreshing drinks.

This Lavender & Honey Sparkling Lemonade is everything you want in a spring beverage. It has the perfect balance of tart and sweet, and has a hint of relaxing lavender. Not to mention the bubbles- they make this drink!
If you are hosting Easter brunch this year, this Honey & Lavender Sparking Lemonade will be a huge hit with your guests, and its so easy to make. Serve it in campaign flutes if you want to get super fancy! You can even make the lemon concentrate the night before and add the soda water right before you are ready to serve. Some other great recipes for Easter or any Spring-day brunch are my Asparagus & Hashbrown Egg Casserole (another super easy dish), or if you are looking to satisfy your sweet tooth Cinnamon Bun Pancakes are also an excellent choice.

Happy Spring!
Lavender & Honey Sparkling Lemonade

Lavender & Honey Sparkling Lemonade has the subtle sweetness of golden honey, tart and refreshing lemony zest, gentle floral notes, and the perfect amount of bubbly sparkle! This Springtime-inspired bubbly beverage is great for brunch. Healthy, and not too sweet, this delicious and beautiful mocktail will be a huge hit!
- 6 lemons
- 1/3 cup creamed honey ((regular honey will work too))
- 1 liter sparkling water
- 2-3 tablespoons lavender sprigs
-
Juice the lemons, and remove any seeds. You should yield about 1/3 cup of lemon juice.
-
Combine the lemon juice and honey in a high speed blender and been until honey has fully dissolved and the concentrate is frothy.
-
Divide the concentrate evenly into 4 glasses, or pour into a pitcher. Sprinkle the lavender sprigs over the concentrate than fill the glass/pitcher with sparkling water. (you can either chill the sparkling water prior to serving or add ice if you prefer.


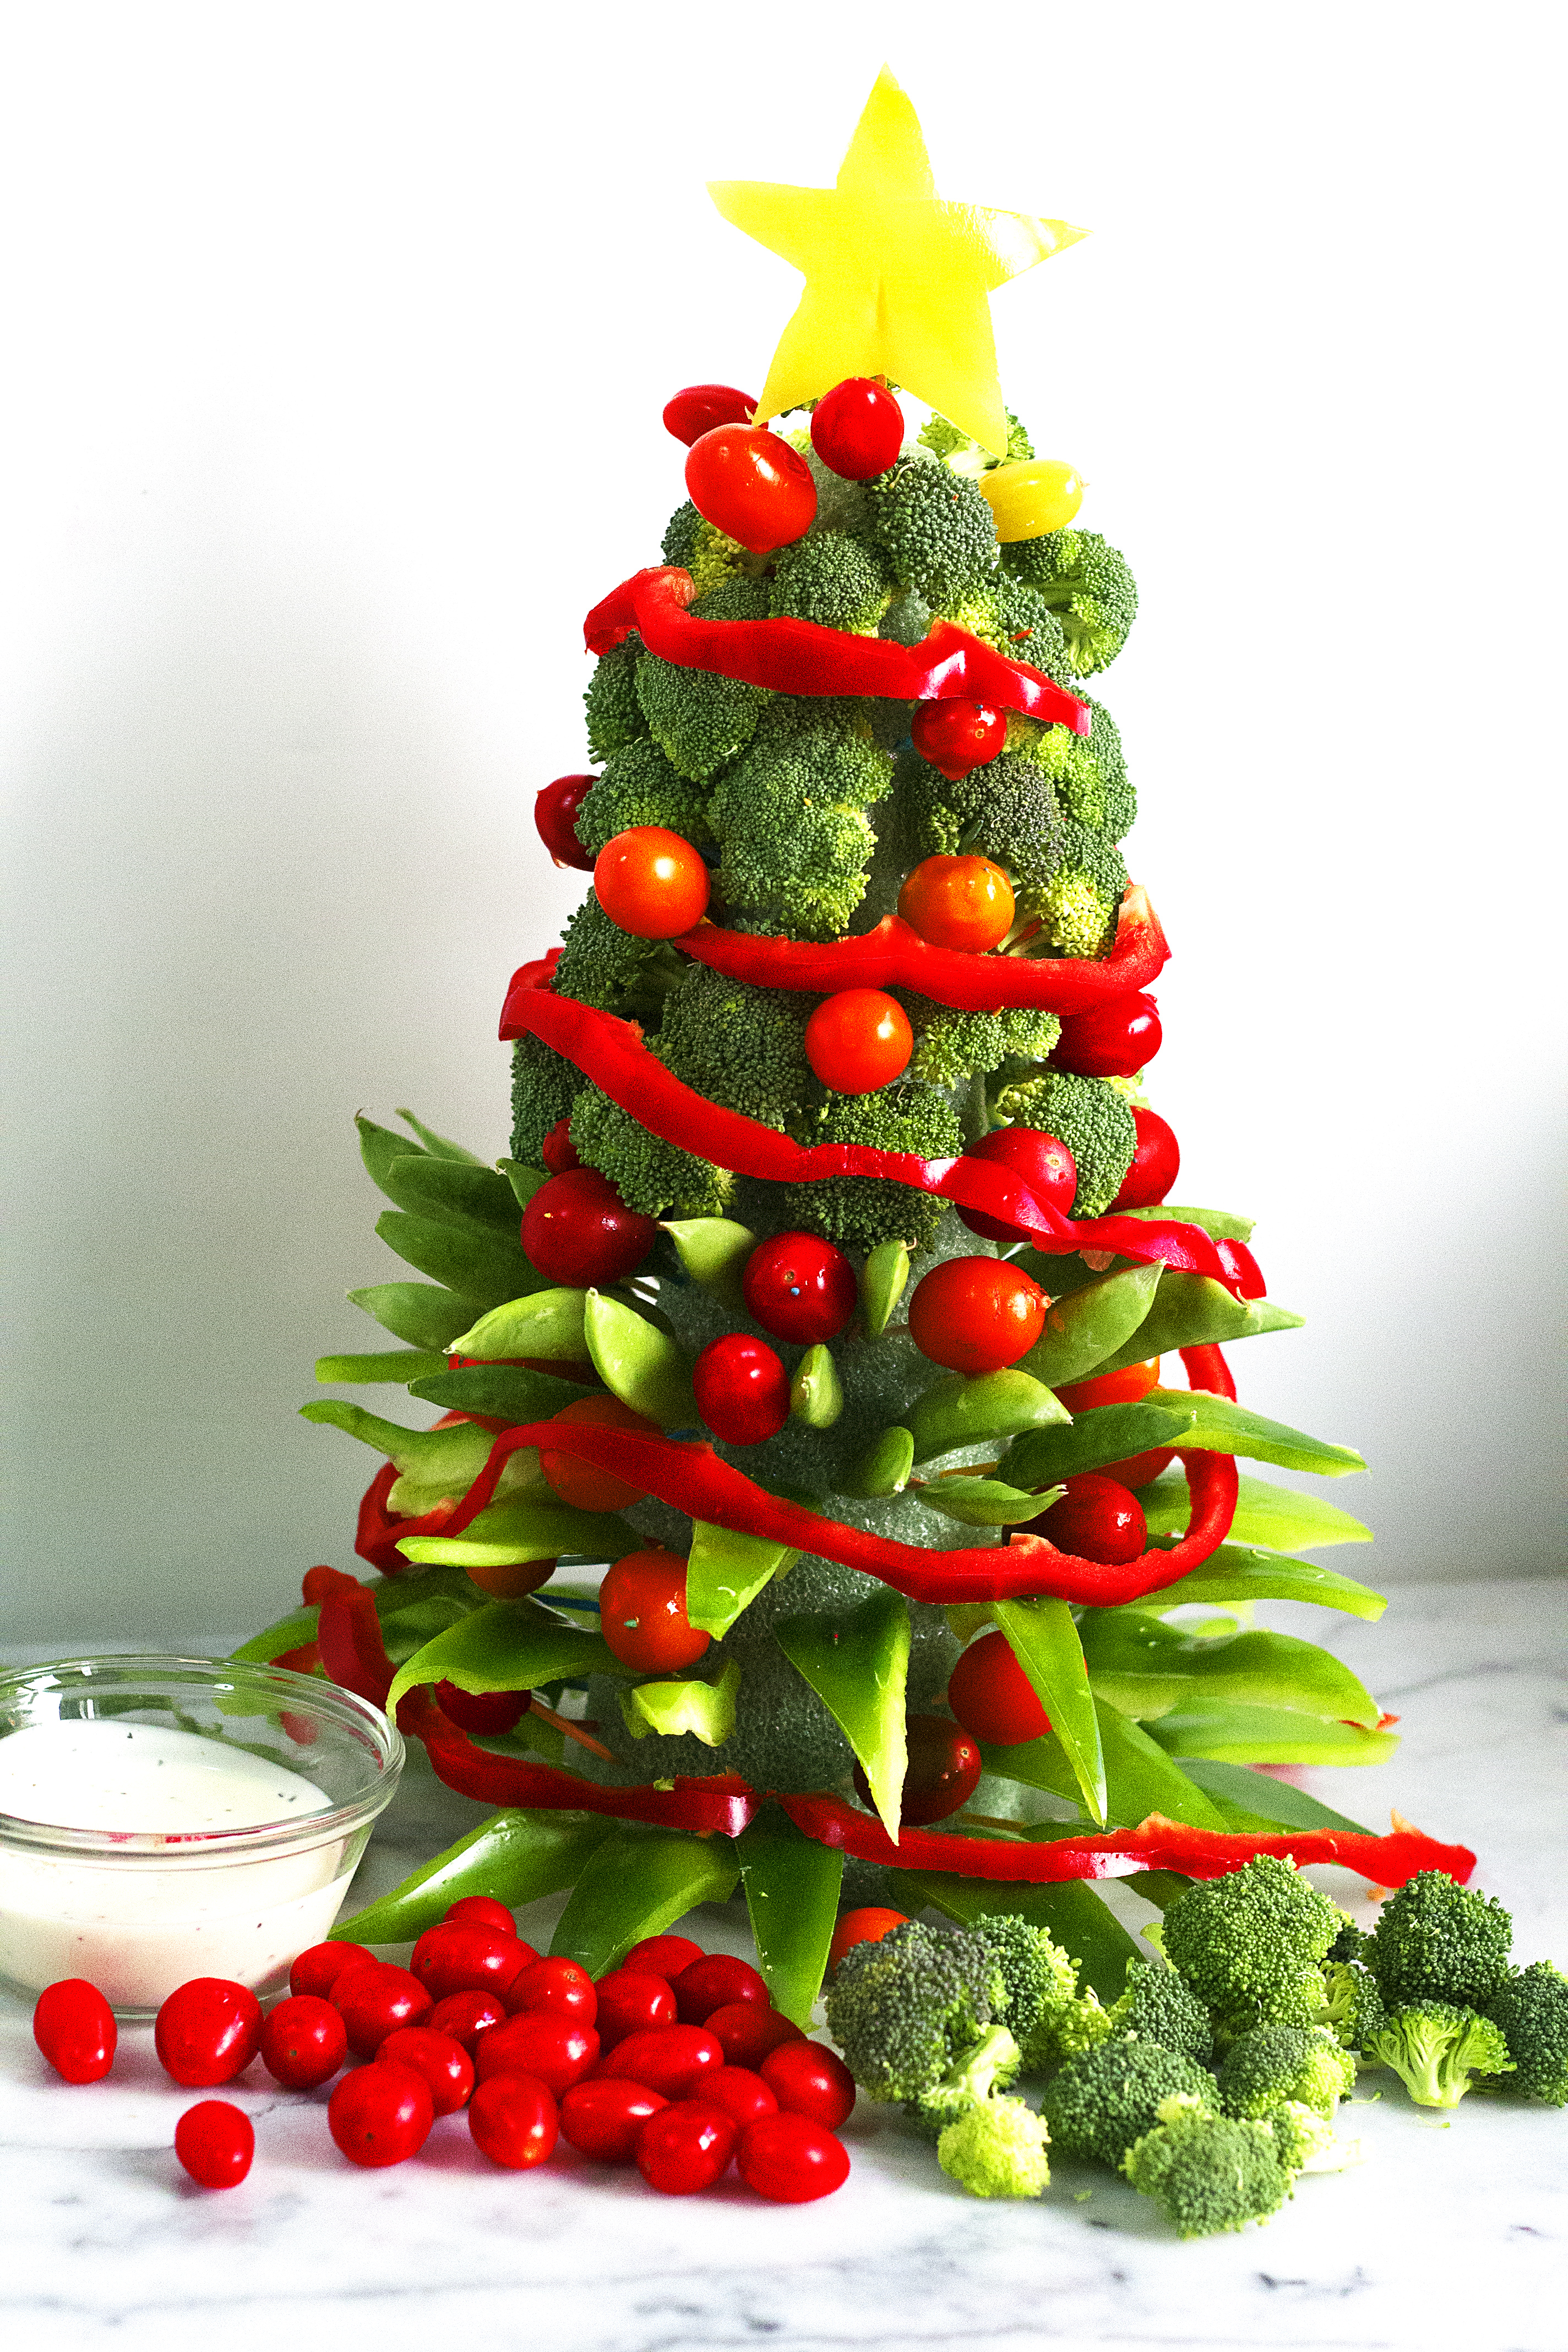

 I recently moved, and the first thing I did when I unpacked was get out my Christmas decorations. There is something about dressing up the house for Christmas that makes me so joyful. Do you guys feel the same way? Today while I was making this Veggie Christmas Tree I put a pot of potpourri on the stove top and had the Holiday Log Music Special playing nonstop to get that Christmas Spirit up and running.
 We had multiple Christmas trees, the banisters where dripping with garland and lights, the chandeliers held beautiful springs of spruce and holly, and even the toilet was adorned with Christmas decor! It was a Christmas wonderland, second only to the North Pole.
 Well, don’t worry, I have got you covered! The super cute Veggie Christmas Tree only takes a few minutes to make (the kids can have fun putting it together), and it looks amazing. Added bonus, it’s a tasty and healthy alternative to other popular holiday appetizers.


 My partner in crime, Cricket also loves her autumn hikes in the woods. She would always act extra spry due to the chilly weather, darting from tree to tree, sniffing out all the squirrels.:)


 It’s that time of year again- the holiday season is upon us! It seems to sneak up on me every year. Do you guys feel the same way?? One minute its a hot sweltering summer day in August, and with the blink of an eye (so it seems) we are on the cusp of Thanksgiving! I mean, where does the time go?


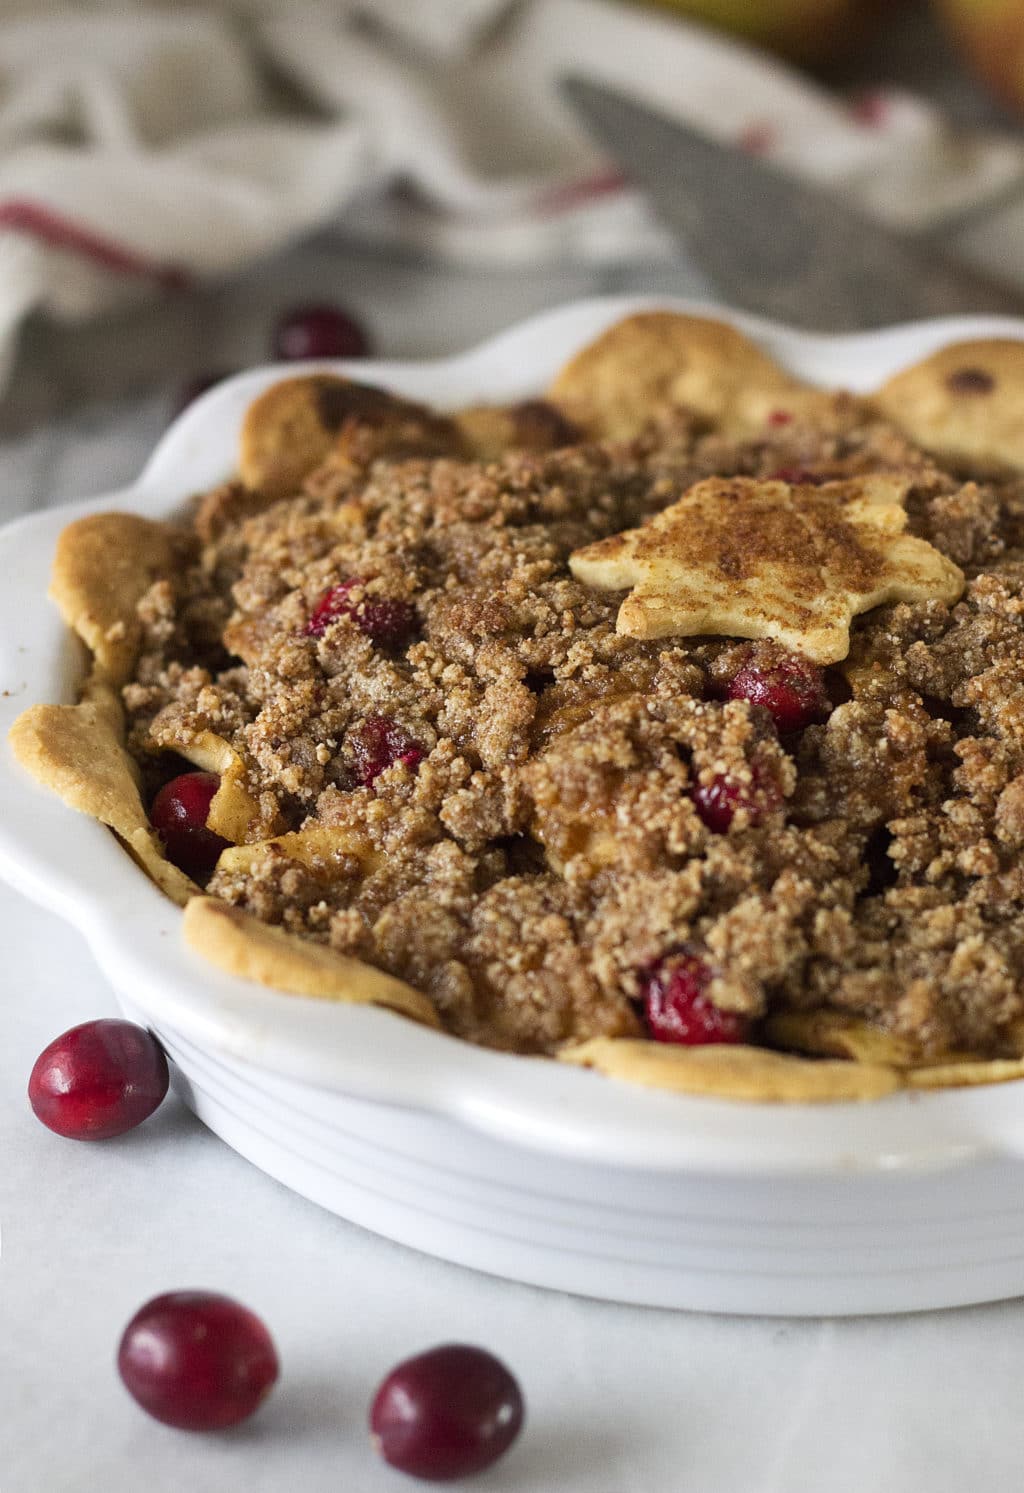
 This perfect Pumpkin Pie with Sticky Pecans will stun you with its beauty and win you over with its taste! Its creamy sweet pumpkin filling pairs nicely with some fluffy coconut whip cream-yum! Your guests will never ever guess it’s gluten free, grain free, paleo, and healthy! Your holiday spread will not be complete without this one!
 Pumpkin pie has always been my ALL TIME favorite pie. I know, there’s apple pie, pecan pie, cherry pie, strawberry- rhubarb pie, lemon meringue pie, chocolate cream pie….. am I missing any of your favorites? They are all good, I must admit. Each and every one has a special place in my heart (and stomach!), but the pumpkin pie is the winner.
 There is something about the creaminess, the smooth texture, with earthy sweet pumpkin and spice flavor that really satisfies. Heck, it has a seasonal latte named after it that people go crazy for this time of year, so I know I am not the only one who is obsessed with pumpkin pie flavor!
 I am usually so stuffed after a Thanksgiving feast that I can barely move and have to fight the urge to put on sweats just for the extra room in the elastic waistband. haha.
 It’s a must try, so you got to make it this year. You and your holiday guest will not be disappointed:)


 But she hung around anyway. You know, just in case something takes a spill onto the floor then it’s fair game!